
The 3D Print Challenge
With all of Richard Schmoyer's SUNQUEST dial drawings available on the web, I decided that it would be a fine 3D printing project for the North American Sundial Society. I use a filament 3D printer (Prusa i3 MK2) that heats plastic, allowing the filament to be extruded into any shape. The plastic I’ll use is Poly-lactic Acid or simply “PLA”, which is a biodegradable thermoplastic derived from renewable resources, such as corn starch in the United States and Canada. Elsewhere PLA comes from sugarcane or even tapioca root. To make the PLA flow properly the 3D printer must be heated to 210 Celsius.
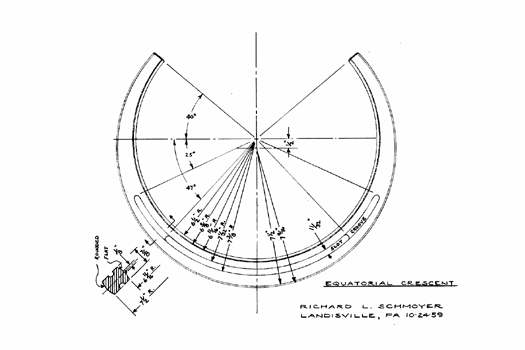
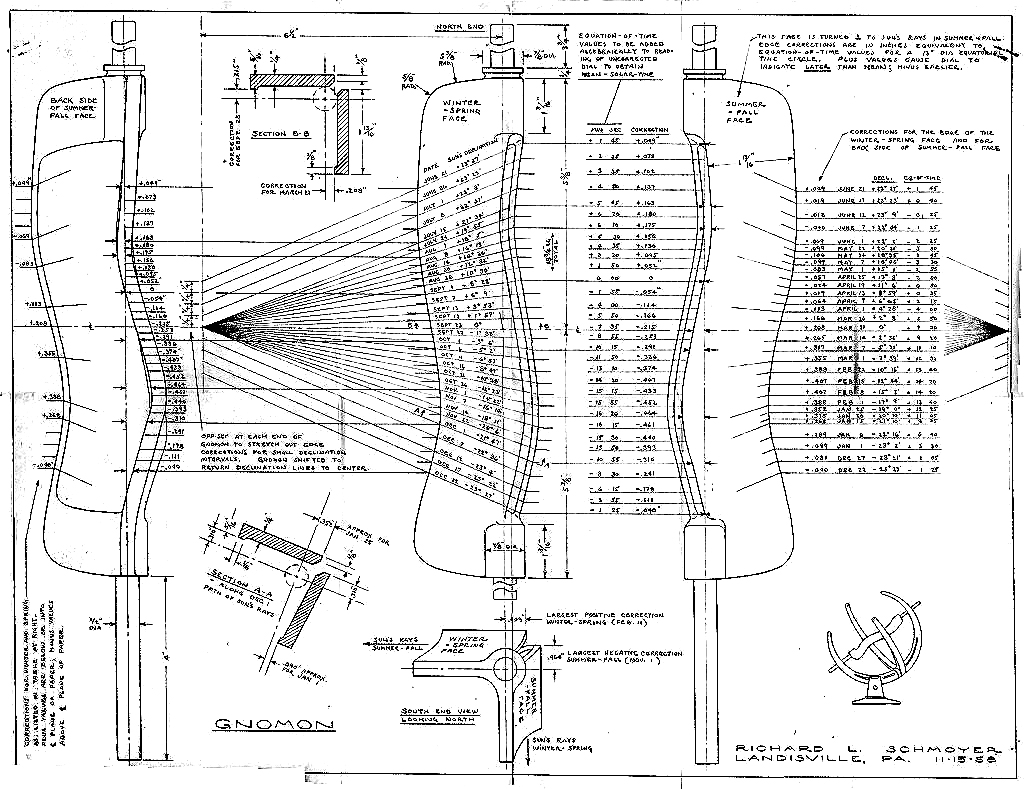
So the challenge is to use the 3D printer to create parts that matched Schmoyer's detailed drawings suc as the equatorial crescent shown here at the right.
The Modeling Process
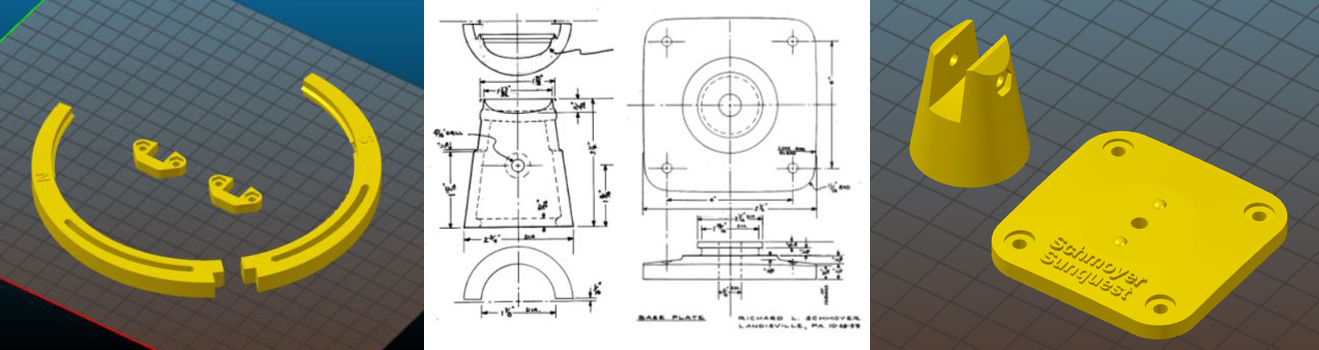
To render this drawing into a 3D sundial part, I use OpenSCAD, a public domain application for numerical computer aided design. The language is reminiscent of Visual Basic. But it focuses on creating and manipulating fundamental 3D basic shapes such as cubes, cylinders, and polygons under programmatic control. There is a set of translation and rotation operators for placement of the objects and Boolean operators for concatenating or subtracting one object from another.
To create the equatorial crescent ring I used two cylinders of slightly different size with vertically offset centers. A boolean operator takes the difference between the two cylinders, leaving the crescent. Other booleans drill out the slot, leaving a 3D stereolithographic file (STL) that conforms nicely to Schmoyer's drawing. The slot will allow the crescent to be rotated back and forth on the sundial’s meridian ring. This adjustment allows for both longitude correction of time and daylight savings time. As you’ll see in a moment, Schmoyer uses the gnomon itself to adjust for the equation of time.

The Slicing and Printing Process
Once I've designed SUNQUEST STL files, they need to be prepared for 3D printing. This step is called “slicing”. Here I use a program called Slic3r to take the STL object and decompose it into many horizontal layers, like pages of a book. These layers will be printed sequential by my 3D printer, ultimately forming layer by layer, the STL object in plastic. There are a number of slicing programs such as “CURA” , “Slic3r”, “CraftWare”, Netfabb, Rep-et-ier, and Simplify3D. After experimenting with a number of these programs, I prefer Slic3r. That’s “Slicer” with letter “e” turned backward in hacker format using the number 3. Here is an example of two of the many layers that make up the Equatorial crescent and a photo of it being printed.
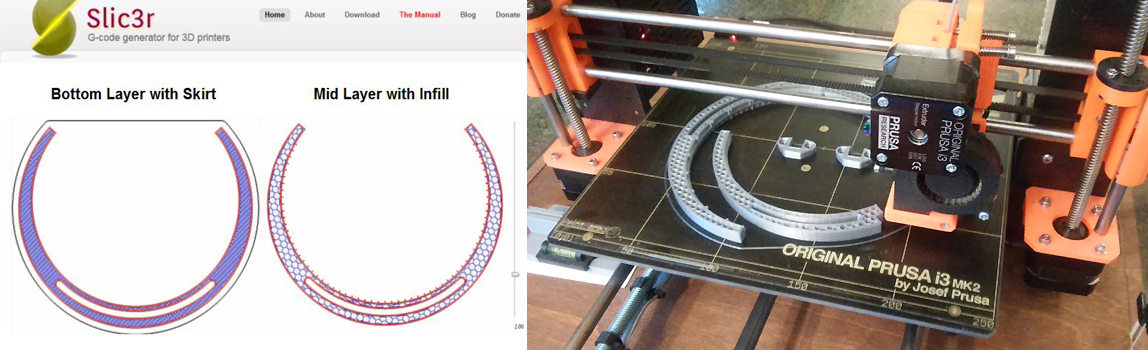
The interior of the dial could be solid, but it is more efficient to select an infill pattern like a honeycomb that uses only 20 percent of the volume. Each layer is 150 microns thick. This is a compromise between fast printing that uses a 200 micro layer and wanting a very smooth, detailed surface using a layer as thin as 100 microns Assuming the same speed of extruder nozzle movement, the difference between layers made at 200 vs. 150 microns is the ratio 4/3 and saves 3D print time by one half hour. Even so, to print the Equatorial cresent, meridian quadrants and their braces takes about 5 hours of 3D print time. I've tried increasing the speed of the 3D printer but usually something happens that spoils the final object. So I have had to learn patience.
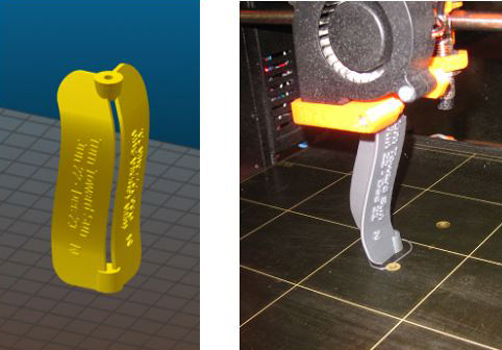
The most difficult part to make is the gnomon. For most equatorial and armillary sundials the gnomon is a simple rod casting a small shadow onto the equatorial time ring. But Richard Schmoyer took the shape of the sun's apparent seasonal motion in the sky (called the "analemma") and embedded it into the shape of the gnomon. As Schmoyer himself explained: "Time is shown, not by a shadow, or by one edge of the [gnomon] shadow as in the familiar garden sundial, but rather by a band of sunlight between two shadows cast by the gnomon onto the [equatorial crescent] time scale." “The gnomon is turned by hand on its axis to sharply define a band of sunlight illuminating the time on the equatorial hour ring. “
“But in reading the sundial, when either the winter to summer or summer to winter gnomon face is turned toward the sun and gradually brought to a position at right angles to the sun's rays, two things happen:
(1) "The effective slot width is reduced or pinched down, making a more narrow line of light fall across the time scale. Turning beyond a right-angle shuts out the direct sunlight entirely, but just short of a position squarely facing the sun, the band can be as fine as you care to see and use to interpolate between the [time mark] graduations."
(2) "The band of sunlight is shifted from the gnomon axis to fall earlier or later on the time scale by an interval necessary to show standard clock time instead of local sun time." This correction is known as the 'equation of time' and is made by the curve of the SUNQUEST gnomon."
Most important in this gnomon design is that it converts solar time back into civil time. The Schmoyer SUNQUEST dial allows you to read the time that corresponds to your wristwatch!
In November,1958 Richard Schmoyer created a detailed drawing of the gnomon showing the curve displacement for every week during the year. This was truly a monumental calculating and drafting effort. The analemma shape is accurately represented in the middle of the gnomon, but as one gets near the solstices, the analemma is physically stretched a bit to accommodate the rapid change in the equation of time. In his dial, Schmoyer allows “The effective portion of the enlarged curve [to be] brought into play by manually moving the entire gnomon axially north or south."
Rather than copy all of Schmoyer’s numbers to create the gnomon shape, I took the polynomial approximation to the equation of time (EOT) and used the sun’s declination to find the scaled gnomon displacement. This was probably the hardest part of designing the dial, since it forced me to make the gnomon of very, very thin rectangles… one for each 12-hour time span. These rectangular layers are like brickwork that are moved laterally to create a slight overhang and moved forward and back for the appropriate EOT displacement all according to the sun’s declination. Think of it as building a wavy wall one layer at a time, but each layer is perfectly straight.
| [ ] | 2186 kB |